Sunday, May 17, 2015

Understand The Function Path and Vector

Path is a tool that is owned by Photoshop to create "A Vector". The purpose of the Vector is the result of a graphic that can give rise to various forms of digital graphics that appear on the computer screen.
Excess vector has been highly used by CorelDraw software in the field of graphic design. And Adobe Photoshop at the beginning was not so supportive if the graphics function, because more difokusan as an image editor. But on further development, Adobe Photoshop even more increase in output means of manufacture Vector newest series, especially very visible since Photoshop CS series (CS-1 and above).
Excess than there is on neatness vector images and shapes lines and angles are generated so that the quality of a graphic form is not reduced, as occurred in the result of a photo image that rests on the pixel size of the image.
(Caption above) Although superficially similar, the results of the processing of a colored layer 'Gradient' above has the distinction, one between them is processed by using the 'Selecting Area Tool' that depends on the size of the pixels of the image in question, which makes the display picture was as fragmented and increasingly fragmented when enlarged, while the right image, we can see a color gradient layer looks more presentable color gilding the edges, it is because the layer processing on the right are processed using the Vector Path that does not depend on the size of the pixel image , but based on a bitmap vector which is technically stored by the memory of the computer grapis.
Before we make vector processing functions Path Tool, it is better if we opened the window pane "Path Side Panel".
(Picture above) 'Tool Path', 'Options that seems', and 'Panel Path' which supports the 'Tool Path'

When we click on the menu 'Tool Path', it will automatically appear Path Option panel. From Path Option, we can choose the tools that are already available in performing the functions Path. There are several things to consider in the use of Path Tool to create a Vector Path;

a. It is better between the 'Vector Path' with the 'Vector Path' that others are in a separate Layer (differentiated) 

b. (IMPORTANT) A layer which contains a Vector (Vector Layer Mask), can not be applied to the 'Selecting Area Tool' or applied to the filter image except after in-'Reasterize'kan or in-'Convert To Smart Object '... 

c. Several Tool in Photoshop is also not applicable to Path tool, such as the functions of the menus in the 'Image' and 'Filter Image'. 

d. A Vector can help us in running some limited Tool retangular functions, namely by following the steps below;

1. Identify an area in the image by using the 'Selecting Area Tool', then we can convert it into a form Path, or we can do the opposite (right make Path without doing 'Selecting Area'), then it will create a form of 'Path';


UNDERSTANDING THE DIFFERENCE IN THE LAYER OF AREA TOOL Selecting TOOL AND PATH SELECTION

Results of Area Selector geometric shapes and geometric shapes created with the Vector Path is actually similar, and have some similarities, among them, every process of selecting the same tool area together to form a new layer, but there are some minor differences between the two fundamental;

1. Layer made with Area Selector is not thinking about the Vector Mask that can later be altered form, as established by the Path Layer

2. Layer Path Path has its own in addition to the Layer Panel Option Option Panel, and part of this separate layer and can be seen only appear if we direct mouse in a box that has the Path Layer is concerned.
(Picture above) are layers formed using Path (Vector Path) that had Vector Mask
(Picture above) are layers formed using Area Selecting Tool (A Geometric Shapes that are not using (Vector Path), so it does not have the Vector Mask, but has a mask similar to the Vector Mask called 'Layer Mask'

Tips Understanding and how to use the Photoshop Image Processor

Image Processor is a tool provided by Adobe Photoshop to make it easier to process many image files uniformly, in a short time. Say, one day we want to reduce the size of the photographs of our collection, but the large number of photos sometimes decreases the amount of productivity and requires a lot of time in processing these photographs, or any time we want to explain, clarify or darken the color display photographs exist in the collection of our album, but we are constrained by limited time, then, 'Image Processor' can be used as an alternative.
Menu Image Processor is located in the 'File Option', in the 'Scrips';
Once we open the windows 'Image Processor', we can find several menus to choose from, among others, set the size of the photos you want to minimized / or its enlarged Pixel size, change the shape of a JPEG file into a PSD or TIFF, or change or add effects to the photos, explaining, sharpen, or reduce the brightness of the color photographs that have been there before. In terms of providing a touch of editing the latter, then we must first have a setting that we have stored previously, the settings already stored (recorded), can be referred to as 'Preset', or Settings already stored.

To make sebuh Preset, first we need is a picture that serve as a reference, say File A, which has the atmosphere of brightness or color that is similar to the other fotofoto we want to give a touch of similar effect. Then we open the Window 'Action', it would appear a 'Panel Action' which contains the options 'action' at the bottom;
a. Stop Recording; to limit the 'action' / action that you want to be 'Preset' b. Recording; start the process of saving 'presets' c. Play; play (running) action undertaken d. New Folder; to group actions made e. New File; to create a setting that contains new actions f. Delete; to 'remove' Action and the folder containing the saved Actionaction.


TIPS TO KNOW MENU, shortcuts KEYBOARD, TOOL AND OPTION TO USED TO USE THE PROGRAM PHOTOSHOP

Before discussing further, it helps us to know at a glance about the functions rather than the tools found in Adobe Photoshop program window. And how to raise or eliminate these windows.

MENU

Let us discuss one by one the usefulness than the existing menus in Photoshop program;

1. Menu "File", to open or close the file, it also serves to export-import pictures / photos, or used also to close / exit the program Adobe Photoshop. NB: To open a file from within the Photoshop program, can use the Shortcut: Ctrl + O To close the file being executed, can use the Shortcut: Ctrl + W to close the Photoshop program, can use the Shortcut: Ctrl + F4 To start a new project, or create a new image from Photoshop program, can use the Shortcut: Ctrl + N
2. Edit menu, more useful tool to assist functions, and here, the edit function more often unused.
3. Menu "Image", is associated with the object or image which we process. 'Option menu'Image can lighten or darken image, adjust the color saturation of an image, make pictures more bluish or reddish, and other sebaginya ...
4. Menu "Layer". First of all we have to understand layers. What is meant by layer is the layers of an existing object in an object image / images are being processed. A general description of the layer will be somewhat profound, yet simple, the layer can be exemplified as coating layer of paper which we are coloring or are we edit colors and shapes which the object, a layer of glue dapay with other layers.
5. Menu "Select" is still closely linked to the function layer and the object in question.
6. Menu filter, already discussed above, many filter functions we use when we are processing a photograph, (not a vector). For the function "Analysis", "View", "3D" and "Help", is not too important to be discussed here.
7. Menu "Window", to raise or eliminate some of the functions of a window or panel -Touch present in the Adobe Photoshop program.


SHORTCUT FUNCTIONS THAT WE NEED TO KNOW IN PROGRAM PHOTOSHOP.
  • Ctrl + N (New, new file)
  • Ctrl + O (Open, Open File)
  • Ctrl + W (Close undertaken a project file)
  • Ctrl + C; (Copy)
  • Ctrl + V; (Paste)
  • Ctrl + (+); Zoom in object (memeprbesar)
  • Ctrl + (-); Zoom in (Reduce)
  • Ctrl + R; (Ruler); raises ruler
  • Ctrl + T; (Transform); compose the layout of the image (flip through, rotate, tilt or straightening)
  • Ctrl + Z; (Undo), In photoshop, apply only one step to go back to back.
  • Alt + Tab; to move from one project file to another project file (if we're simultaneously working on two or more files at a time)
  • Space, to shift the image when it has been in zoom in
  • Backspace (To annul a process when performing the polygonal lasso tool
  • Click right on the mouse (To view the settings of one additional tool that was to proceed
  • ... and so forth.

TIPS HOW TO KNOW DIFFERENT “TOOLS” AND “OPTION”

Tool can be called as a function commonly used in processing adobe photoshop. Window / panel this tool may be hidden in the menu selection menu 'window', but to hide the 'Tool', is not recommended.
The window "option", will appear in accordance with the functions of the tools we are run.
In this case, we will discuss some of the functions that are essential for the Toolbar's viewpoint in the Adobe Photoshop program in advance.
(Caption above) "Tool" usually has been located on the left side rather than the computer screen, while the "Options" are at the top of the program photoshop. Window "Tool" contains several functions and 'menus' which is important in terms of image editing, and photo editing functions.

Some brief explanation of the function of the "Tools" is as follows;

  • Move tool; to move or shift the image.
  • Rectangular / Elliptical Marque tool, all of which can also be referred to as 'Area Selector' or 'Selecting Area Tool'; to mark the object rather than the image.
  • Polygonal Lasso tool; has a function that is not much different from its function with the Rectangular Marquee Tool as 'Selecting Area Tool'
  • Magic wand tool; also has a function similar to the two tools above (selector area)
  • Crop tool; for mengcrop a picture / image
  • Eyedrop tool; to take samples or reference certain colors rather than an object or image, which will be applied with the foreground color and background color.
  • Spot Healing Brush tool and similar tools; to remove one point or stain in a photograph
  • Brush Tool; serves as a brush, which can disapuhkan with image or image objects in question
  • Clone stamp, serves to create an object with a specification of a particular color or shape can be spread or 'diklonikan' in the image (shape) similar
  • Eraser; as eraser Layer
  • Gradient tool; to help us create a gradient layer coating instantly
  • Dodge tool; to change a light touch dama one colored object
  • Blur tool; making fuzzy or smooth an image
  • Pen tool; to create a path creation; vector objects; a line object and others
  • Type tool; to create a single object writing; to write in photoshop
  • Path selection tool; to help us in editing an object path
  • Polygon tool; to create an object that has a regular path (dikreasikan), such as a triangle / quadrangle 'or other objects.
  • Hand tool, to shift the object when in Zoom in
  • Zoom Tool, To do Zoon in or Zoom Out image
  • While the 'Option' or 'Options Bar', will appear if we had chosen one of the existing tool and will provide options, or menus that support the use of tool that we are using.

PHOTOSHOP AS PHOTO & IMAGE EDITOR

Photo editor function in Photoshop is more widely used in color editing, or simply cut a photo / image.

In this photo editing, window (a window) that is essential is the window "Tool" and the window "layer". In this training, we will not explore or discuss extensively about the functionality of Photoshop which plays an important role in the history of photography. But at first glance, we will memahas several important functions that, God willing, will be useful when we want to edit or improve the quality of the photos that we have taken through the camera.

If our focus is on one of the pictures, then the toolbar that will play a part in the 'image', in which there are functions of 'adjustment' that contains functions to lighten or darken the color of the photo, making it the only touch of color change black white (monochrome) and others.

Another case, if we want to edit more than one object, then the image function, follow each layer is concerned. And keep in mind that one layer to another layer are not related to each other, as long as the layers are not coupled to each other layer, (or merged).
The second function that can not be overlooked in making the creation and editing of photos is; image filter function. Here many photo filter options that can be chosen, and these functions can embellish a photo.

SOME IMPORTANT TOOL IN PHOTO EDITING:
1. Selecting Area Tool (Marking An Area in Pictures)
This tool is useful for marking photos by area that we choose, more to mark an area by area coloring, if we want to mark a special colored area and did not include one other colored areas, 'Rectangular Tool' or 'Elliptical Tool' can be applied , Selecting Area Tool is also sometimes useful to mark a layer, with records; The layer is no longer in the locked state with the Path tool.

 Some tools are still associated with the 'Selecting Area' tool:

        a. 'Lasso Tool', 'Polygonal Lasso Tool' and 'Magnetic Lasso Tool'
        b.'Magic Wand Tool '
NB: In meggunakan 'Rectangular Tool', we can set the 'feather area' (level of refinement an area marked), by right-clicking and choosing the level of his feather

2. Healing Tool
 'Healing Tool' contains some tools with different branches of its functions, but the most frequently used is 'Spot Healing Brush Tool', is used to remove a single point or a stain on the facial image in landscape photos.

3. Blur Tool
 The function of the 'Blur tool' is to refine one part of a photo area. Usually the picture that comes from the pieces look too sharp, rigid, and less presentable, then this is where the function 'Blur Tool' needs. If right-clicking on the 'Tool' section 'Blur', we also see the other tool, which is a branch of 'Blur Tool', which is 'Sharpen Tool' and 'Smudge tool'. 'Sharpen Tool' has the opposite function than the blur tool, where the sharpen tool is useful for sharpening a detail of the image, while the smudge tool is useful to move or make a point on the object as color fade or merge

Some Special Functions In the Filter Useful In Editing Photos

To improve some of the quality of the photos, we also can use special functions in the filter, among them;
a. Lens Correction, used to edit photos or correct distortions caused by the camera lens Yag
b. Liquify, giving the effect of distorting the appearance of a photograph
c. Sharpen, To sharpen images
d. Blur, To smooth the picture in picture

Glance Alloy Color To Create Beauty In Photoshop - c. pattren

c. Pattren

If interpreted literally, then the Pattern means 'style'. The meaning here is a pattern, a pattern that consists of a pattern of repeated images that create a digital motif.
We can see the Pattern on the motif, songket and others, we can also say that the chessboard is composed of black and white Pattern box, leather leopard pattern also has a 'totoltotol' in the skin, so did the quail eggs, there is a pattern 'dotted-dotted' which make it look beautiful. Pattern also means color combinations, but in the form of regular and repetitive, thus forming a pattern. In digital imaging with Adobe Photoshop program, Pattern widely used as an ornamental processed an image, so that an image looks more beautiful and lively with the additional effect of this pattern.
Adobe Photoshop has provided a pattern that can be applied directly to the image we want to decorate, only, pattern provided a limited form. To that we can add to the collection pattern by downloading it from the Internet, which then can we add to the program Adobe Photoshop. Pattern files downloaded normally existence (its file type) form of (___, pat) is to be used is copied to the folder:
"C: \ Program Files \ Adobe \ Adobe Photoshop CS5 \ Presets \ Patterns"
And we also can make your own pattern that we want, by following the steps below;
1. Create a new file (New File) with the same length and width (rectangular equilateral), for example; 1000 pixels x 1000 pixels or 5 cm x 5 cm.
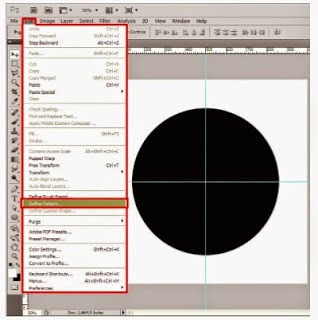
2. Activate the line guides and make two lines are guides which one transverse and one longitudinal line is the line again, so we'll get a midpoint that is a meeting point guides from the image. 3. Make a pattern of pattern we want, and place the pattern that has been benjadi layer is right in the middle of the image. 4. Then select the Edit menu Option; and select the 'Define Pattern', click ok, then automatically a pattern we just created a new pattern has been formed.
5. We can try our newly created Pattern to create a new image or a new layer, then select menu pattern in 'Layer tool'.

Glance Alloy Color To Create Beauty In Photoshop - a. COLOURS

Glance Alloy Color To Create Beauty In Photoshop

a. COLOURS

In the graphic in the world of digital and visual, there are two important elements that form the basis of everything; namely Color and Light. Both of these can not be separated because it is very close relationship with each other.
In this case, we should at least understand a little more about color and light system that runs on a computer, especially those in the Photoshop program we use today.
If we open the New Layer in Photoshop, then we will see the setup window (tool window) that exist, there are several options that show us the color settings. There are several things that must be understood related setting / color settings that better we know.


1. RGB color mode; Is the abbreviation of three colors namely name 'Red', 'Green' and 'Blue', which means the Red, Green and Blue, is a basic component of the color of the constituent elements of the entire color appears on the computer screen. The three colors will form millions of colors that we can see with our eyes, supported by light / gamma emitted by the monitor. However, in practice, the results of editing and printing photos will not be able to match what appears on the screen, because the color is processed from the printed ink consists of collaboration, and not from the collaboration of light. So simple, display 'RGB' will look more bright and conspicuous than that produced by the photo printing machines because of differences in constituent elements. Collaboration ink produced by the printing machine and screen printing machine consists of four basic colors are abbreviated as 'CMYK'.
2. CMYK Colors, are abbreviations consisting of four names of colors; Cyan (Blue / usually light blue), magenta (red / usually pink), Yellow / Yellow, and Key (or the key of the previous three colors; black is the key to all the colors that exist in this universe). CMYK color system is also highly dependent on the means of print media, the print paper and ink quality. Printed paper is white, the color intensity of the white paper will provide additional influence on the intensity of the ink prints and touches of colorful ink that consist of three four primary colors 'CMYK' will provide color on the paper.
Therefore, getting a digital imaging results that will be exactly the same as what appears on the monitor can be said to be almost impossible, because the image display that appears on the monitor screen actually tend to be brighter than the printout is generated.
Outside the fundamental differences that exist in the system underlying color digital imaging, it helps us to know a little about the colors that are ideal for digital imaging. In the digital processing of color rendering is too bright sometimes be an option that is no better than memberian a touch of color that are not so obvious, as well as if when we give a touch of color that is too dim even sometimes make digital imaging results that we process becomes less comfortable viewing , Therefore, it helps us to know a few things about color and how to combine colors that we choose in order to create a digital imaging results are beautiful and unsightly. Here I will give you some easy tips in choosing colors;

a. Natural colors
Natural colors we know, where there are colorful flowers, trees and green grass, blue sky and sea, and the land is brown is the color combination that has actually been made beautiful by God and worthy of being the main reference that we can take in a selection of colors. Even in some ways, there is a situation or condition which contrasts contrasting colors that we see are still menyugukan a beautiful view and comfortable viewing. Then use a natural color as the main colors in the digital processing is the main recommendation.

b. Colour Harmony;
Harmonic colors are colors are taken from the natural colors as well, just, harmonious colors better understood as a color that tends to seem soft and dim. Harmonious colors are colors that sometimes we often get from nature, such as the color of Emerald Green and Blue Topaz. Color harmony is more likely as the colors are whitish or grayish or dark colors that are not too dark, so that the colors blend harmoniously low-contrast or striking with other colors. If we create a work of digital imaging using the base color CMYK, the harmonious colors are applied to files that we process it automatically

c. Decisive and bold colors
If we are able to combine two or more natural color well, or been able to combine the color hrmonis with one another with a slick color, there is no harm if we want to display a combination of colors more bold and assertive. The use of color expressly does contain risks, which will make a digital processing will be seen tend to be too conspicuous. For this reason, it's good for us to be a little more digging a lot of information about how to combine the right colors to create a digitally processed good and beautiful.

Call it a combination of the colors red, yellow, green and then purple and blue is a color combination that is sharp, but still comfortable viewing, because the combination of the four colors was widely known as a combination of colors of the rainbow. Similarly, in kokbinasi Black and Yellow, Black and White and others.
And references that can be referenced in the processing of this color combination is on the keyword 'Color Wheel', or 'Color Combination' in a search engine such as Google.

Tips on Maximizing sharpness of your photo

Produce sharp images as sharp as sharp is the desire of many lovers of photography, and a variety of camera features and additional accessories have been created to help us produce this sharp photos. From a tripod, a stabilizer (or camera lens) to the image editor software that comes tool to sharpen the picture the end result.
Here ita try to summarize some tips so that your photos sharper. Let's see what the hell her tips ..
1. The first thing to do and understand it is the degree to which you master the technique of holding the camera properly. This technique is very important, as good or as sophisticated whatever your camera if it holds less accurate way will have an impact on the outcome of the photo. Especially when shooting a very crowded field.

2. Furthermore, namely how to press the Shutter button on the camera. Pay attention and know well how to push the button.

3. Shutter Speed, if you speed up the shutter speed, then your pictures will be sharper. Remember the basic rule that a sharp picture when you shoot handheld: "use a shutter speed faster than the focal length of your lens." Look penjabarannya:
• If the length of your 50mm lens, shoot with a shutter speed of 1/60 second or faster
• If your lens is 100mm long, use a shutter speed of 1/125 second or faster
• If your lens is 200mm long, use a shutter speed of 1/250 second or faster

4. Aperture
Aperture affects the depth of field (the area of ​​focus in your photos). Reducing the aperture (increase the number, for example you choose the f / 22) will add depth of field, meaning the sharp area in the greater picture include objects that are near or far, so that the sharpness of the picture as a whole would be reduced.
Then do the opposite, select a large aperture (small numbers, for example f / 4), then you will focus sharply area just near the focus. Selecting a large aperture allows you to get a faster shutter speed.

5. ISO
Adding ISO will accelerate the shutter speed and lets you choose a larger aperture. If you take pictures in the room, the one ISO view, but do not overdo it (eg: select ISO 600 for shooting inside the house). select ISO that is too high (above 800), can lead to noise (small black spots) in an image began to appear.

6. Focus
Do not just believe with autofocus camera, check carefully use your eyes are the eyes of a focal point. When photographing the face at close range, make sure the focus falls diarea eye. When photographing an object, make sure the focus is there where you want the sharpest area. Autofocus camera could be wrong and instead focus besides dropping the object you want.

7. The Lens
If you happen to have an SLR camera, choose the best lenses you can buy. Good quality lens that can drastically improve the sharpness of your photo. KIT lenses are usually offered for sale as a complete package along with the quality of its cameras usually earned. My advice, if you are going to buy a new SLR camera, buy separately between camera (body only) and lens. Do not buy the KIT package. Lens with good quality usually characterized by a large aperture (eg f / 2.8).

8. Sweet Spot Lens

The lens has its sweet spot respectively. Sweet spot is certain where the lens aperture will produce the sharpest picture. Sweet spot lenses are usually two stops above the maximum limit of the ability of the lens aperture. For example, for lenses f / 2.8, the sweet spot is in its f / 5.6. Then use an aperture of f / 5.6 if you take pictures with the lens, your photo will be sharp razor sharp. If you are curious to know how your lenses sweet spot, read a short article about the test lens sweet spot here.

9. Tripod

Tripod is impractical and inconvenient, but if you are "willing to" bring it, you will get sharper photos. Especially if you want to generate the HDR or panoramic photo, zealous bring a tripod.

Photos from the perspective of learning composition and Vanish Point

It could be said that the perspective and vanishing point is a point that needs to be considered in taking photos. Well, if you've listened to teachers explain the theory of art of art, the word perspective certainly never occurred. Perspectives in art is how to give the impression of space in the painting, how to keep objects painted canvas (or papers) as if it really has the dimension of space. Well because a lot of borrowed photographic art theory, especially in terms of composition, there is a need for us to know.
In photography, one of the most effective ways to give perspective on the photograph is to utilize the vanishing point (or points lost = vanishing point). What ?? vanishing point? gone where? to door "Doraemon" ?. Instead, called vanishing point because as if an object is, the more rearward position will be decreasing shape.
By utilizing this vanishing point, when photographing the road it will look increasingly smaller and narrower so as to give the impression of long distances. When you are photographing a row of electric poles and cables, the more backward will look shorter and long coincide to form a point. Well, the point is called the vanishing point. See the photo above, is a large wooden bridge at the beginning and the smaller backward as if the end of the two fused into a point, disappeared.
Photo above is a perfect example for the perspective one vanishing point (one point perpective), which bridge becomes the bookmark details. If there is one point, if there are two points. There, please see sample photo below:
shooting from the corner of the building makes us have a 2 point perspective formed by two field wall of the building above. right-side wall narrows unity point, on the left side wall narrows to another point